
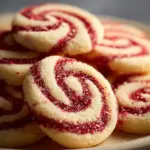
Imagine a festive cookie that not only delights your taste buds but also fills your home with the cheerful aroma of peppermint. Peppermint Swirl Cookies are the delightful treat you’ve been searching for! These cookies are not just visually stunning with their beautiful red and white swirls; they offer a perfect balance of flavors. With a soft texture and a minty finish, they are ideal for holiday gatherings, cookie exchanges, or simply sweetening up your day.
Why We Love This Peppermint Swirl Cookies Recipe
One of the most appealing aspects of Peppermint Swirl Cookies is their versatility. Whether you’re preparing for the holidays or simply looking for a sweet treat, these cookies fit the bill perfectly. The combination of buttery richness and refreshing peppermint extract creates a taste experience that is both familiar and unique. Plus, the stunning swirls make them a show-stopping addition to any dessert table. They are fun to make, and the step-by-step process engages your creativity in the kitchen. It’s a delightful way to share love and warmth with friends and family!
Ingredients about Peppermint Swirl Cookies
To create these delightful cookies, you will need some basic yet essential ingredients. Below is the complete list with precise measurements to ensure your baking venture goes perfectly:
- 2 ½ cups all-purpose flour
- 1 teaspoon baking powder
- ½ teaspoon salt
- 1 cup (2 sticks) unsalted butter, softened
- 1 cup granulated sugar
- 1 large egg
- 1 teaspoon vanilla extract
- 1 teaspoon peppermint extract
- Red gel food coloring
- ¼ cup coarse sugar or crushed peppermint candies for coating
These ingredients work together to create a soft, chewy cookie that is both visually appealing and delectable.
How to Make Peppermint Swirl Cookies Directions
Making Peppermint Swirl Cookies is a thoughtful yet straightforward process. Let’s dive into the steps that will guide you through crafting these delicious treats:
- Combine Dry Ingredients: Start by whisking together the all-purpose flour, baking powder, and salt in a medium bowl. This ensures that the dry ingredients are evenly distributed and ready for mixing.
- Cream Butter and Sugar: In the bowl of a stand mixer fitted with a paddle attachment or using an electric hand mixer, beat the softened unsalted butter and granulated sugar on medium-high speed for about 3 to 5 minutes. The key is to achieve a light and fluffy mixture that incorporates air, helping the cookies become tender.
- Add Egg and Extracts: Lower the mixer speed to prevent splattering. Add one large egg and mix until just combined, scraping down the sides of the bowl as needed. Then, include the vanilla and peppermint extracts.
- Incorporate Dry Ingredients: With the mixer on low, slowly add the flour mixture in thirds, mixing just until combined. Avoid overmixing at this stage to maintain a soft cookie texture.
- Divide and Color Dough: Gently split the dough into two equal parts. Add red gel food coloring to one half and mix until uniform. Leave the other half plain for a beautiful contrast.
- Chill the Dough (First Chill): Shape each half of the dough into discs, wrap them tightly in plastic wrap, and place them in the refrigerator to chill for at least an hour. This chilling step makes the dough easier to handle.
- Roll Out the Doughs: After chilling, take out one disc of dough. Lightly flour your working surface and rolling pin, or roll between sheets of parchment paper, until it forms a rectangle about 12×10 inches and ¼ inch thick. Repeat with the second disc.
- Layer the Doughs and Create the Swirl Log: Place one rolled dough rectangle on the counter. Gently invert the second rectangle on top. Press together slightly, then roll from one of the longer sides to form a tight cylindrical log.
- Refine the Log and Chill Again (Second Chill): Liberally smooth the log and wrap it in plastic wrap. Chill for another 2 hours or overnight. This makes it easier to slice without losing the swirl.
- Preheat Oven and Slice Cookies: Preheat your oven to 375°F (190°C) about 20 minutes before you’re ready to bake. Line two baking sheets with parchment paper. Remove the chilled log and slice it into rounds approximately ¼ inch thick, revealing those enchanting swirls!
- Bake the Peppermint Swirl Cookies: Place the cookie slices on the lined sheets about 1 inch apart. Bake each sheet for 8 to 11 minutes until the edges are light golden and the centers are just set.
- Cool Cookies: After baking, let the cookies cool for about 5 minutes on the sheets before transferring them to a cooling rack. This helps maintain their crispiness and prevents sogginess.
- Decorate (Optional): If you want to add a festive touch, you can roll the cooled cookies in coarse sugar or crushed peppermint candies, giving them a sparkling appearance and an extra zing of flavor.
How to Serve Peppermint Swirl Cookies
Serving Peppermint Swirl Cookies is a joyful occasion! These cookies are the perfect treat for any gathering. When you present them, consider a few serving suggestions:
- Festive Platter: Arrange the cookies on a colorful plate or a holiday-themed tray. Their striking appearance is sure to catch the eye of your guests.
- Cookie Jars: Fill clear jars with your Peppermint Swirl Cookies and place them around your home for decoration and easy access. Guests can help themselves, and it adds a cozy touch to your décor.
- Coffee or Tea Pairing: Serve these cookies alongside a warm cup of coffee or tea. The refreshing peppermint and the rich, buttery flavor compliment hot beverages wonderfully.
- Gift Idea: Place a few cookies in a clear bag tied with a festive ribbon. These make delightful homemade gifts during the holidays or any celebratory occasion!
Expert Tips: Peppermint Swirl Cookies
To ensure your Peppermint Swirl Cookies are a hit, consider these expert tips:
- Soften Butter Properly: Make sure your butter is softened adequately, not melted. Leave it out at room temperature for about an hour prior to mixing.
- Don’t Skip the Chilling: Chilling the dough not only makes it easier to handle but also helps prevent spreading. Patience will lead to perfect cookies!
- Use a Sharp Knife for Slicing: A sharp knife will allow you to make clean cuts on the chilled log, showcasing the lovely swirls without squishing the dough.
- Experiment with Colors: While red is traditional, you can experiment with different colors of gel food coloring to make your cookies stand out in your unique way!
- Keep a Close Eye While Baking: Since ovens can vary, keep checking on your cookies during the last few minutes of baking to ensure they do not overbake.
How to Store Peppermint Swirl Cookies
Keeping your Peppermint Swirl Cookies fresh and flavorful is essential. Here are safe storage tips:
- Airtight Containers: Once cooled completely, store the cookies in an airtight container at room temperature. This helps maintain their soft texture and prevents them from drying out.
- Layering: If you have multiple layers of cookies, place parchment paper between them to avoid sticking together.
- Freeze for Longevity: If you want to enjoy these cookies later, freeze them. Wrap each cookie in plastic wrap and store in a freezer bag. They can last up to three months!
- Thaw Carefully: When you’re ready to enjoy frozen cookies, thaw them in the refrigerator overnight or at room temperature for a few hours.
Variation of Peppermint Swirl Cookies
Though the classic Peppermint Swirl Cookies are delightful on their own, don’t hesitate to experiment with variations:
- Chocolate Peppermint Swirls: Substitute half of the flour with unsweetened cocoa powder for a chocolaty twist. The contrast with the peppermint flavor is divine.
- Shortbread Base: For a richer flavor, consider using a shortbread dough base instead of standard cookie dough.
- Different Extracts: If you prefer a less intense flavor, you can adjust the peppermint extract amount or add a little almond extract for a nutty warmth.
- Addition of Chocolate Chips: For those who can’t resist chocolate, add some mini chocolate chips to the dough before rolling them up.
- Holiday Sprinkle: Top with colorful holiday sprinkles before baking for an extra festive touch!
FAQ
Here you can find answers to some common questions regarding Peppermint Swirl Cookies:
What makes peppermint swirl cookies special?
Peppermint Swirl Cookies are special because of their vibrant colors and tasty flavor combination of buttery cookie dough with refreshing peppermint. Their beautiful swirls make them visually appealing as well.
Can I use regular food coloring instead of gel?
While you can use regular food coloring, gel food coloring typically provides a more vibrant hue and doesn’t alter the dough’s consistency as much.
How can I ensure my cookies don’t spread too much while baking?
Proper chilling of your dough is key, as is making sure your butter isn’t too soft at the beginning. Avoid overmixing your dough when combining ingredients, as this can also lead to spreading.
Can I double the recipe?
Absolutely! Doubling the recipe is a great idea if you are preparing for a large gathering. Just ensure you have ample space on your baking sheets and enough chilling time for both batches.
What can I do with leftover peppermint swirl cookie dough?
If you have leftover dough, freeze it for later use. Shape the dough into a log and wrap it tightly before freezing. You can slice and bake them fresh when you’re craving a sweet treat!
With these steps and tips, you can create Peppermint Swirl Cookies that bring joy and delight to any occasion. Enjoy the cookie-making process and the delicious results!
Peppermint Swirl Cookies
Ingredients
Dry Ingredients
- 2 ½ cups all-purpose flour
- 1 teaspoon baking powder
- ½ teaspoon salt
Wet Ingredients
- 1 cup unsalted butter, softened Use 2 sticks.
- 1 cup granulated sugar
- 1 large egg
- 1 teaspoon vanilla extract
- 1 teaspoon peppermint extract
Coloring and Coating
- as needed red gel food coloring For coloring half the dough.
- ¼ cup coarse sugar or crushed peppermint candies For coating the cookies.
Instructions
Preparation
- Whisk together the all-purpose flour, baking powder, and salt in a medium bowl.
- Beat the softened unsalted butter and granulated sugar for about 3 to 5 minutes until light and fluffy.
- Add the egg, vanilla extract, and peppermint extract, mixing until just combined.
- Slowly add the flour mixture in thirds while the mixer is on low, mixing just until combined.
Dough Preparation
- Divide the dough into two equal parts. Add red gel food coloring to one half and mix until uniform.
- Shape each half into discs, wrap in plastic wrap, and chill for at least 1 hour.
- Roll out each disc into a rectangle about 12x10 inches and ¼ inch thick.
- Layer the two rolled doughs, pressing together slightly before rolling them into a tight cylindrical log.
- Wrap the log in plastic wrap and chill again for 2 hours or overnight.
Baking
- Preheat the oven to 375°F (190°C) about 20 minutes before baking.
- Slice the chilled log into rounds approximately ¼ inch thick.
- Place cookie slices on lined baking sheets 1 inch apart and bake for 8 to 11 minutes.
- Let cookies cool for about 5 minutes on the sheets before transferring to a cooling rack.
Decoration
- Optionally, roll the cooled cookies in coarse sugar or crushed peppermint candies for a festive touch.