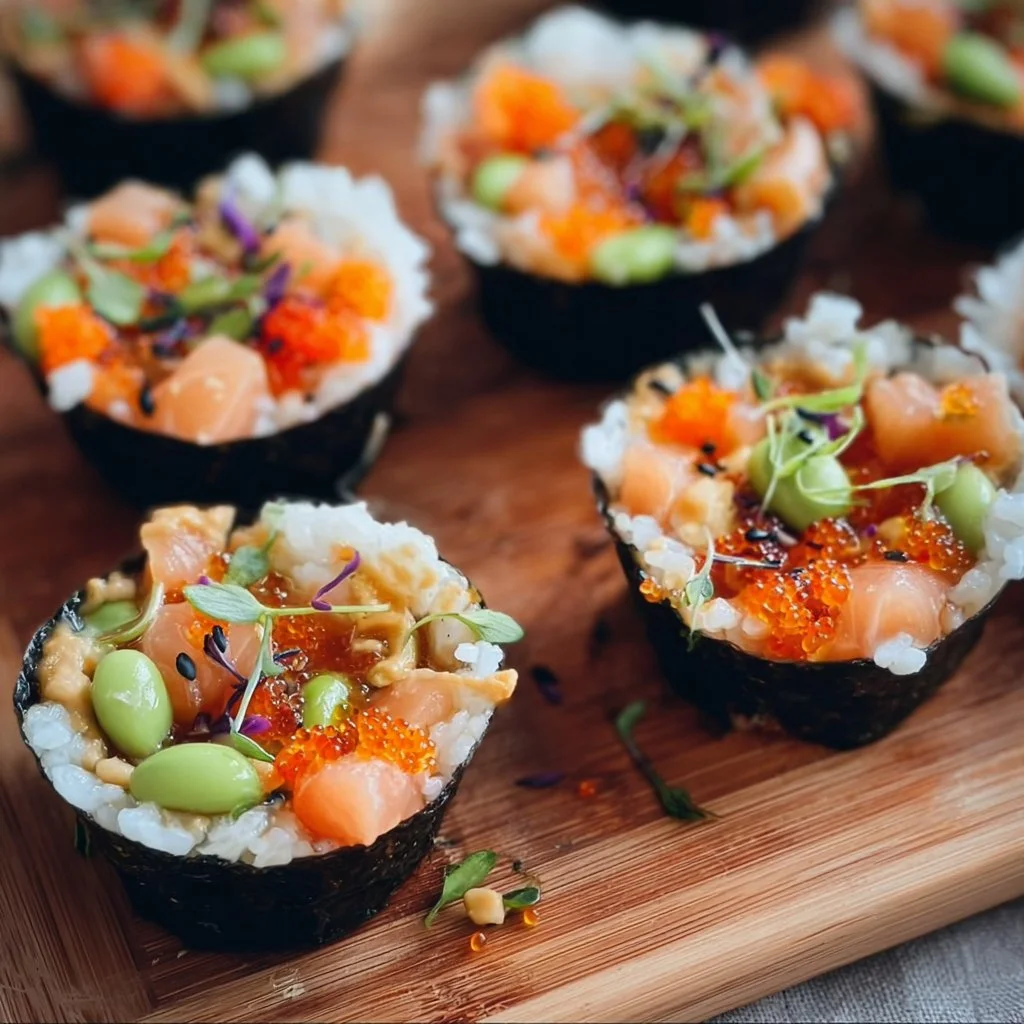
Sushi cups present an exciting and convenient way to enjoy the delicious flavors of sushi without the traditional rolling technique. These bite-sized portions bring together the essence of sushi using rice and fresh, colorful ingredients, making them a perfect appetizer or snack for gatherings, parties, or a casual meal at home. With their customizable toppings, you can cater to various tastes and preferences, ensuring that everyone at your table finds something to enjoy.
Why We Love This Sushi Cups Recipe
Sushi cups are a game-changer! They offer a delightful twist on classic sushi by eliminating the fuss of rolling. You can personalize each cup with your favorite fillings and toppings, making them a versatile dish suitable for any occasion. The combination of sticky sushi rice and vibrant vegetables creates a satisfying texture and taste. Plus, they’re visually appealing, adding a pop of color to your plate. Whether you’re hosting a get-together or simply craving something fresh and tasty, these sushi cups are sure to impress your family and friends.
Ingredients about Sushi Cups
When it comes to making sushi cups, fresh and simple ingredients are key. Here’s what you’ll need to whip up this delightful dish:
List of ingredients with measurements
- 1 cup sushi rice, rinsed
- 1 ½ cups water
- ½ cup finely chopped veggies of your choice (carrots, cucumbers, bell peppers, etc.)
- ¼ cup steamed mukimame (shelled edamame)
- ¼ cup diced avocado (about ½ small avocado)
- 1 tablespoon sauce of your choice (soy sauce, tamari, or coconut aminos)
- ¼ cup mayonnaise
- 1 teaspoon Sriracha sauce (adjust to taste)
- 1 teaspoon coconut aminos or soy sauce
- 1 teaspoon honey
- ½ teaspoon sesame oil
- Black sesame seeds (for garnishing)
How to Make Sushi Cups Directions
Making sushi cups is a fun and straightforward process that begins with preparing the sushi rice. Start by rinsing your sushi rice under cold water until the water runs clear. This step is crucial for removing excess starch and achieving the perfect sticky consistency.
Next, combine the rinsed rice and water in a medium pot. Bring it to a boil over high heat. Once bubbling, reduce the heat to low, cover the pot, and let it simmer for about 20 minutes or until the rice is fully cooked and the water is absorbed. After this, remove it from heat and allow the rice to cool slightly while you prepare your fillings.
To create the sushi cups, you’ll need a muffin tin. Take the cooked rice and press about two heaping tablespoons into each muffin cup, compacting it down firmly. This step ensures that your cups hold their shape once they are unmolded. Place the muffin tin in the refrigerator and chill for about 20 minutes, allowing the rice to set and firm up.
While the rice is cooling, it’s time to prepare the filling. In a mixing bowl, combine your choice of chopped veggies, steamed mukimame, and diced avocado. Drizzle with coconut aminos or soy sauce, mixing well to allow the flavors to blend. The combination of textures and colors in this filling is as inviting as it is delicious.
For an extra flavor kick, you’ll want to make a spicy mayo. In another bowl, whisk together the mayonnaise, Sriracha sauce, honey, and sesame oil. Feel free to adjust the Sriracha sauce according to how spicy you like it. This creamy, spicy sauce adds a unique dimension to your sushi cups.
After the rice has chilled, remove the muffin tin from the fridge and carefully spoon a heaping tablespoon of the veggie filling on top of each rice cup. Then, drizzle your spicy mayo over the top, creating a delightful contrast of flavors. To finish, sprinkle black sesame seeds for that final touch of elegance and flavor.
How to Serve Sushi Cups
Once your sushi cups are assembled, it’s time to serve them! These captivating little cups can be placed on a beautiful platter for a visually stunning presentation. They are perfect as a party appetizer or as part of a light lunch spread. Pair them with additional sauces like soy sauce or tamari for dipping, and consider serving them alongside pickled ginger and wasabi for an authentic sushi experience.
Sushi cups also serve well as a fun activity for guests, allowing everyone to customize their cups with their favorite toppings. You could even set up a sushi cup bar, offering various fillings and sauces, encouraging creativity and collaboration among your guests. They not only taste great but will also spark conversation and excitement around your dining table.
Expert Tips: Sushi Cups
To ensure your sushi cups turn out perfectly every time, keep these expert tips in mind:
- Use high-quality sushi rice: The type of rice you use will greatly affect the texture of your sushi cups. Look for sushi or short-grain rice for the best results.
- Don’t skip the rinsing step: Rinsing your rice before cooking is crucial for removing excess starch, resulting in a better texture.
- Let the rice cool slightly: If the rice is too hot when pressing it into the muffin tin, it may not hold its shape properly. Allow it to cool for a bit to make it easier to handle.
- Experiment with fillings: Don’t feel limited by the suggested ingredients. Try different combinations of veggies, proteins, or even fruit for a fresh twist.
- Garnish creatively: Use different toppings to make your sushi cups pop with color. Thinly sliced radishes or microgreens can elevate the visual appeal.
How to Store Sushi Cups
If you happen to have any sushi cups left over (which is unlikely, given how delicious they are!), you can store them for future enjoyment. Place the sushi cups in an airtight container and store them in the refrigerator. They are best consumed within one or two days for optimal freshness. If you want to extend their shelf life, consider storing the rice and fillings separately. You can easily assemble fresh sushi cups when you’re ready to enjoy them again!
Variation of Sushi Cups
One of the best aspects of sushi cups is their versatility. You can easily adapt the recipe to suit your preferences or dietary needs. Here are a few variations to consider:
- Protein-packed versions: Add diced chicken, shrimp, or tofu to the veggie mixture for a heartier meal. You can also add cooked crab or fish for a more traditional sushi experience.
- Veggie overload: If you’re looking to maximize your veggie intake, pack your cups with various colors and types of vegetables. Consider zucchini, radishes, or beets for an explosion of flavor and nutrients.
- Vegan sushi cups: Skip the mayo and use avocado or a tahini-based dressing to keep your cups completely plant-based. You can also include a variety of sprouts for added crunch.
- Fruity twist: For a unique touch, consider adding pineapple or mango to your filling for a sweet twist that complements the savory elements.
- Different sauces: Experiment with different sauces like teriyaki, hoisin, or peanut sauce to create entirely new flavor profiles.
FAQ
What are Sushi Cups?
Sushi cups are bite-sized versions of sushi that utilize sushi rice molded into small cups and filled with various fresh ingredients, making them easy to enjoy without the need for rolling.
What kind of rice do I use for Sushi Cups?
Using sushi rice or short-grain rice is essential for achieving the sticky texture needed to hold the cups together effectively.
Can I customize the Sushi Cups?
Absolutely! You can customize your sushi cups with different veggies, proteins, and sauces based on your tastes and dietary preferences.
How long can I store Sushi Cups?
Sushi cups are best eaten within one to two days if stored in an airtight container in the refrigerator. For longer shelf life, store the rice and fillings separately until ready to eat.
Are Sushi Cups suitable for vegans?
Yes! You can easily make sushi cups vegan by using plant-based fillings and skipping the mayo or using a vegan alternative.

Sushi Cups
Ingredients
For the Rice
- 1 cup sushi rice, rinsed Use high-quality sushi rice for the best texture.
- 1.5 cups water
For the Filling
- 0.5 cup finely chopped veggies of your choice (carrots, cucumbers, bell peppers, etc.) Customize with your favorite vegetables.
- 0.25 cup steamed mukimame (shelled edamame)
- 0.25 cup diced avocado (about ½ small avocado)
For the Spicy Mayo
- 1 tablespoon sauce of your choice (soy sauce, tamari, or coconut aminos)
- 0.25 cup mayonnaise
- 1 teaspoon Sriracha sauce Adjust to taste.
- 1 teaspoon coconut aminos or soy sauce
- 1 teaspoon honey
- 0.5 teaspoon sesame oil
For Garnishing
- to taste black sesame seeds For garnishing.
Instructions
Prepare the Rice
- Rinse sushi rice under cold water until the water runs clear to remove excess starch.
- Combine rinsed rice and water in a medium pot. Bring to a boil, then reduce heat to low, cover, and simmer for about 20 minutes until rice is fully cooked and water absorbed.
- Remove from heat and let rice cool slightly.
Assemble the Cups
- Press approximately two heaping tablespoons of cooked rice into each muffin cup. Compact firmly.
- Chill the rice cups in the refrigerator for about 20 minutes.
- In a mixing bowl, combine chopped veggies, steamed mukimame, and diced avocado. Drizzle with coconut aminos or soy sauce and mix well.
- For the spicy mayo, whisk together mayonnaise, Sriracha sauce, honey, and sesame oil in another bowl.
- Once the rice has chilled, remove from the fridge and spoon a heaping tablespoon of the veggie filling on top of each rice cup.
- Drizzle with spicy mayo and sprinkle with black sesame seeds.