
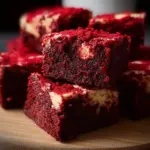
Red velvet brownies are a delightful twist on the classic brownie recipe, merging the moist, rich texture of brownies with the vibrant essence of red velvet cake. These brownies possess an enchanting hue and a subtle chocolate flavor that’s beautifully complemented by the creamy notes of white chocolate or the nutty crunch of pecans and walnuts. When you sink your teeth into a piece of these wondrous brownies, you experience not just a dessert but a celebration that brings together loved ones, whether for a festive occasion or simply a cozy afternoon treat.
Why We Love This Red Velvet Brownies Recipe
This red velvet brownies recipe is a showstopper in both appearance and taste. It not only satisfies your sweet tooth but also ignites a sense of nostalgia, reminiscent of celebratory occasions. The creaminess of the butter and the depth of flavor from the sugars create a decadently chewy brownie that melts in your mouth. Adding a splash of red food coloring transforms the simple brownie into a visually stunning dessert, making it perfect for holidays like Valentine’s Day, birthdays, or any celebration where you want to impress your guests. With a balance of flavors and textures, this recipe ensures that every bite is a memorable one.
Ingredients about Red Velvet Brownies
To create these exquisite red velvet brownies, gather the following ingredients:
List of ingredients with measurements
- 1 cup (2 sticks) unsalted butter, melted
- 1 1/2 cups granulated sugar
- 1 cup packed brown sugar
- 4 large eggs
- 2 teaspoons vanilla extract
- 2 cups all-purpose flour
- 1/2 cup unsweetened cocoa powder
- 1 teaspoon baking powder
- 1/2 teaspoon salt
- 1 tablespoon red food coloring
- 1/2 cup white chocolate chips (optional)
- 1/2 cup chopped pecans or walnuts (optional)
How to Make Red Velvet Brownies Directions
Making red velvet brownies is a simple yet rewarding process that you can master, even if you’re a beginner in the kitchen. Follow these steps to create your batch:
- Preheat Your Oven: Start by preheating your oven to 350°F (175°C). This ensures your brownies begin baking at the ideal temperature for a fluffy yet fudgy texture.
- Prepare Your Baking Pan: Grease a 9×13-inch baking pan and line it with parchment paper. Leave some overhanging parchment on the sides to simplify the removal of the brownies post-baking.
- Mix Wet Ingredients: In a large mixing bowl, combine the melted butter, granulated sugar, and brown sugar. Use a whisk to blend them together until the mixture is smooth and well combined. It should look glossy and inviting.
- Add Eggs and Vanilla: Crack in the eggs one at a time, ensuring you mix well after each addition. Then, pour in the vanilla extract and stir until it’s fully incorporated into the blend.
- Combine Dry Ingredients: In a separate bowl, whisk together the all-purpose flour, cocoa powder, baking powder, and salt. This step is crucial as it helps evenly distribute the leavening agents and cocoa throughout the batter.
- Combine Wet and Dry Ingredients: Gradually introduce the dry mixture into the wet mixture using a spatula or a wooden spoon. Fold it in gently until just combined. Avoid overmixing to help maintain the chewy texture of the brownies.
- Add Color: Stir in the red food coloring, ensuring it’s evenly spread throughout the batter, giving it that trademark vibrant hue of red velvet.
- Optional Add-Ins: If you choose to use white chocolate chips or chopped nuts, fold them gently into the batter for added flavor and texture.
- Pour and Spread: Pour the brownie batter into your prepared baking pan. Use a spatula to spread it evenly.
- Bake: Place the pan in the preheated oven and bake for 25-30 minutes. Start checking at 25 minutes; you want a toothpick inserted into the center to come out with a few moist crumbs, but not wet batter.
- Cool: Once baked, allow the brownies to cool in the pan for about 15 minutes. Use the parchment overhang to lift them out onto a wire rack, allowing them to cool completely before cutting into squares.
How to Serve Red Velvet Brownies
Serving red velvet brownies can be as simple or as elaborate as you wish. For a casual gathering, cut the brownies into squares and serve them warm on a plate. Dust them lightly with powdered sugar for a classic touch. For a fancier presentation, place a square on a dessert plate, add a scoop of vanilla ice cream on the side, and drizzle with chocolate or cream cheese frosting. You can also garnish with fresh berries or mint leaves for a pop of color. These brownies are perfect for any occasion, making them a versatile addition to your dessert repertoire.
Expert Tips: Red Velvet Brownies
To ensure your red velvet brownies turn out perfectly every time, keep the following expert tips in mind:
- Use Room Temperature Ingredients: Allow your eggs and butter to come to room temperature before starting. This helps create a smoother batter that blends well, leading to better texture.
- Don’t Overmix: When combining wet and dry ingredients, fold gently. Overmixing can lead to tough brownies.
- Adjust Baking Time: Baking times may vary based on your oven and the type of baking pan you use. Keep an eye on the brownies as they approach the 25-minute mark.
- Experiment with Flavors: Don’t be afraid to tweak the recipe. You can add a splash of almond extract for an exciting flavor twist or include nuts for extra crunch.
- Let Them Cool: Cooling the brownies in the pan helps set the texture. Cutting them when they are warm can cause them to crumble.
How to Store Red Velvet Brownies
Storing your red velvet brownies properly will help maintain their fresh flavor and fudgy texture. Once they have fully cooled, you can store them in an airtight container at room temperature for up to 3 days. If you want to keep them longer, consider refrigerating them, where they will last for about a week. For even longer storage, you can freeze the brownies. Wrap them tightly in plastic wrap and then place them in a freezer-safe container. They can last up to 3 months in the freezer. When you’re ready to enjoy them, simply thaw them in the fridge overnight or at room temperature for a couple of hours.
Variation of Red Velvet Brownies
Variety is the spice of life, and these red velvet brownies can be customized in a multitude of ways to suit your preferences:
- Cream Cheese Swirl: For a classic red velvet cake flavor, consider adding a cream cheese swirl to the batter. Mix softened cream cheese with a bit of sugar and egg, then dollop it onto the brownie batter and swirl with a knife.
- Frosted Brownies: Frost your cooled brownies with a cream cheese frosting. The tanginess of the frosting pairs beautifully with the sweetness of the brownies, creating a perfect balance.
- Nut Variations: While pecans or walnuts are classic choices, you can try adding hazelnuts or macadamia nuts for a unique flavor profile.
- Chocolate Ganache: For a richer experience, pour a warm chocolate ganache over the brownies before serving. This adds a silky texture that takes them to the next level.
- Stir in Peanut Butter: Swirl in some creamy or chunky peanut butter for a deliciously nutty flavor contrast or create peanut butter brownie bites.
FAQ
What makes red velvet brownies different from regular brownies?
Red velvet brownies are unique due to their vibrant red color and a subtle cocoa flavor that sets them apart from traditional brownies. The red food coloring gives them an eye-catching appearance, making them perfect for special occasions.
Can I use cake flour instead of all-purpose flour?
Using cake flour will result in a lighter texture in your brownies. If you decide to substitute, you may want to reduce the quantity slightly, as cake flour is more absorbent than all-purpose flour.
How do I know when my brownies are done baking?
To check if your brownies are done, insert a toothpick into the center. If it comes out with a few moist crumbs but not wet batter, they are ready.
Is it necessary to use food coloring in the recipe?
While red food coloring is essential for achieving that signature red velvet look, if you prefer to have a more muted color, you can skip it. The brownies will still taste delicious, albeit not as visually striking.
What can I substitute for eggs in this recipe?
If you are looking for egg substitutes, you can use applesauce (1/4 cup for each egg) or a mixture of flaxseed meal and water (1 tablespoon flaxseed meal mixed with 2.5 tablespoons of water per egg). The texture and flavor may slightly change, but they will work well in the recipe.
Enjoy your baking adventure with these delightful red velvet brownies, and share them with your family and friends for a treat that everyone will love!
Red Velvet Brownies
Ingredients
Main Ingredients
- 1 cup unsalted butter, melted
- 1.5 cups granulated sugar
- 1 cup packed brown sugar
- 4 large eggs Room temperature
- 2 teaspoons vanilla extract
- 2 cups all-purpose flour
- 0.5 cups unsweetened cocoa powder
- 1 teaspoon baking powder
- 0.5 teaspoon salt
- 1 tablespoon red food coloring For the signature color
Optional Add-Ins
- 0.5 cups white chocolate chips Optional for added sweetness
- 0.5 cups chopped pecans or walnuts Optional for crunch
Instructions
Preparation
- Preheat your oven to 350°F (175°C).
- Grease a 9x13-inch baking pan and line it with parchment paper.
- In a large mixing bowl, combine the melted butter, granulated sugar, and brown sugar until smooth and glossy.
- Add eggs one at a time, mixing well after each addition. Stir in the vanilla extract.
- In another bowl, whisk together flour, cocoa powder, baking powder, and salt.
- Gradually add the dry ingredients to the wet ingredients using a spatula, folding gently until just combined.
- Stir in the red food coloring until evenly distributed.
- If desired, fold in white chocolate chips or chopped nuts.
Baking
- Pour the brownie batter into the prepared pan and spread evenly.
- Bake for 25–30 minutes, checking at 25 minutes. The toothpick should come out with a few moist crumbs.
- Allow the brownies to cool in the pan for 15 minutes before lifting them out onto a wire rack.
Serving
- Cut into squares and serve warm, optionally dusting with powdered sugar or serving with ice cream.
- Garnish with fresh berries or mint leaves for additional color and flair.