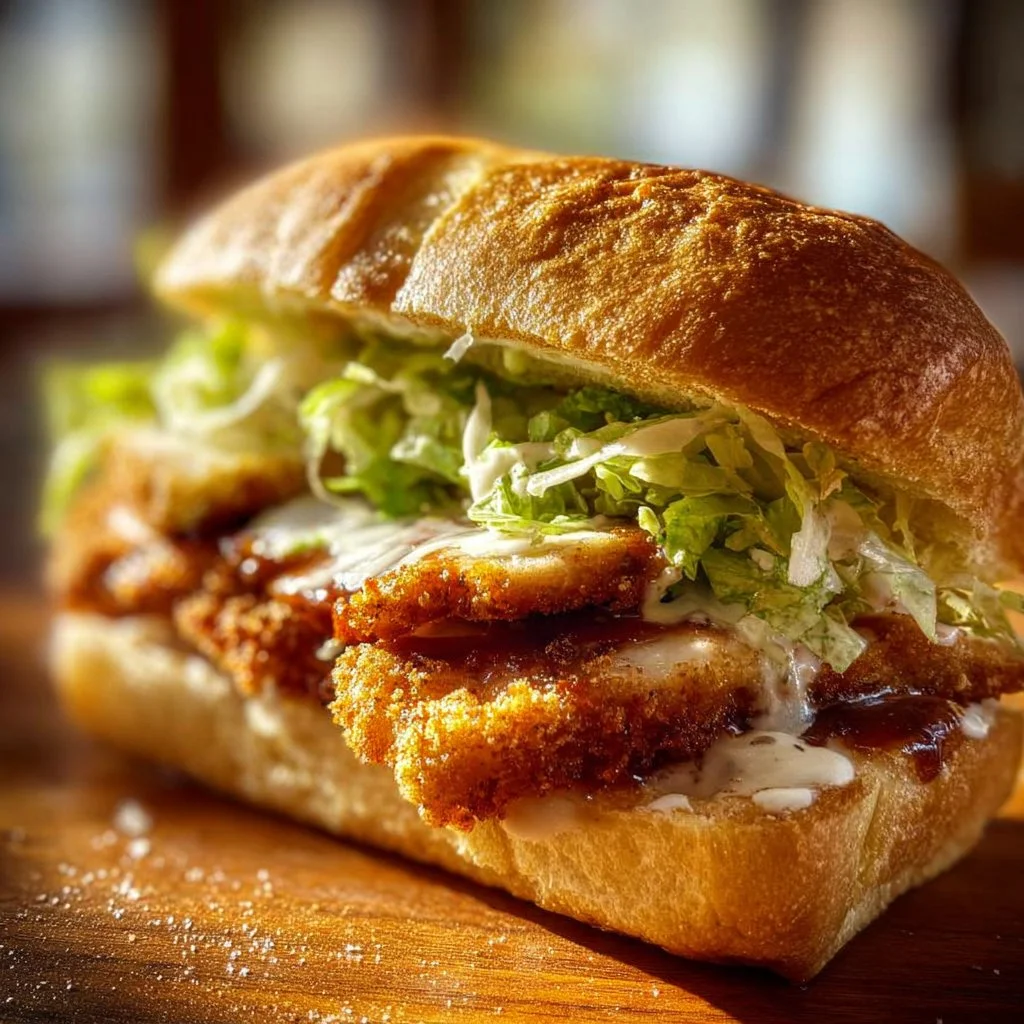
You’re about to embark on a culinary adventure that brings together the crunch of crispy chicken and the classic flavors of Caesar salad in a sandwich that’s sure to become a favorite. The Crispy Chicken Caesar Sandwich combines juicy, tender chicken breasts that have been perfectly breaded and fried to a golden finish, all nestled within a fluffy sandwich roll. With layers of fresh romaine lettuce, creamy Caesar dressing, and a sprinkle of Parmesan cheese, this sandwich promises a satisfying bite every time. It’s perfect for lunch, dinner, or even a casual gathering with friends.
Why We Love This Crispy Chicken Caesar Sandwich Recipe
This Crispy Chicken Caesar Sandwich is not just a meal; it’s an experience. First off, who doesn’t love crispy chicken? The satisfying crunch, paired with the succulent chicken, makes every bite indulgent. The addition of Caesar dressing brings a rich and creamy texture that elevates the flavor profile beyond the ordinary. The freshness of the romaine lettuce adds a nice crunch, and the toasted sandwich rolls hold everything together perfectly. Whether you’re making it for yourself or serving to family and friends, this sandwich will impress. It’s simple to prepare but feels gourmet, making it ideal for any occasion.
Ingredients about Crispy Chicken Caesar Sandwich
List of ingredients with measurements
- 4 boneless, skinless chicken breasts
- 1 cup all-purpose flour
- Salt, to taste
- Black pepper, to taste
- 1 teaspoon garlic powder
- 1 teaspoon onion powder
- 1 cup buttermilk
- 2 cups panko breadcrumbs
- 1/2 cup grated Parmesan cheese
- 1/4 cup olive oil, for frying
- 4 large sandwich rolls, split
- 1 cup Romaine lettuce, shredded
- 1/2 cup Caesar dressing
- 1/4 cup shaved Parmesan cheese
- 2 tablespoons melted butter
- 1 clove, minced
How to Make Crispy Chicken Caesar Sandwich Directions
To create your Crispy Chicken Caesar Sandwich, start by preheating your oven to 400°F (200°C). This step is crucial for giving the chicken that crunchy finish while ensuring it stays juicy on the inside. Take each chicken breast and pound them to ensure they have an even thickness. This not only helps them cook more evenly but also encourages tenderness.
Prepare three shallow dishes to set up your breading station. In the first dish, combine the all-purpose flour with salt, black pepper, garlic powder, and onion powder. This seasoned flour will be the first layer of flavor for your chicken. In the second dish, pour the buttermilk, which will provide moisture and help the breadcrumbs adhere to the chicken. Finally, in the third dish, mix the panko breadcrumbs with grated Parmesan cheese, ready to give that extra crunch.
Now it’s time to coat your chicken. Dredge each chicken breast in the seasoned flour, making sure they are nicely coated. Shake off any excess flour and dip them into the buttermilk, allowing the liquid to envelop the chicken. Then, press the chicken into the breadcrumb mixture, ensuring they are thoroughly covered.
Next, heat the olive oil in a skillet over medium heat. Carefully place the breaded chicken into the hot oil, cooking for about 4 minutes on each side. You’re looking for that lovely golden brown color that indicates the chicken is cooking perfectly. Once they’re nicely browned, transfer the chicken to a baking sheet and finish them off in the oven for approximately 15 minutes. This step ensures that your chicken is cooked through while maintaining that crispiness you crave.
While the chicken is baking, prepare the rolls. In a small bowl, combine the melted butter with the minced garlic. Brush this mixture onto the split sides of the sandwich rolls, giving them a flavorful boost. Pop the rolls in the oven for about 5 minutes to toast them lightly. This step adds a delightful crunch and enhances the overall flavor of the sandwich.
Once everything is cooked and toasty, it’s time to assemble your Crispy Chicken Caesar Sandwich. On the bottom half of each roll, place the crispy chicken breast. Layer on the shredded romaine lettuce for some freshness, followed by a generous drizzle of Caesar dressing. Finish off with shaved Parmesan cheese before topping with the other half of the roll. Your sandwich is now ready to be served warm, and it’s sure to be a hit!
How to Serve Crispy Chicken Caesar Sandwich
To serve your Crispy Chicken Caesar Sandwich, consider pairing it with sides that complement its flavors. A light salad with your favorite greens can balance the richness of the sandwich. You could also serve some crispy fries or even sweet potato fries for a delightful crunch. If you’re in the mood for something extra, try offering some pickles or a tangy coleslaw on the side for an added zing.
Presentation matters, so don’t forget to cut the sandwiches in half to showcase all the delicious layers inside. You can secure each sandwich with a toothpick for easy handling, especially when serving to guests. It’s the perfect meal for picnics, casual lunches, or dinner gatherings with friends and family.
Expert Tips: Crispy Chicken Caesar Sandwich
- Even Cooking: To ensure your chicken cooks evenly, pound them to an even thickness. This step is key for both tenderness and cooking time.
- Double Coating for Extra Crunch: If you want the ultimate crunch, consider double coating your chicken. After the first round of dipping in flour, buttermilk, and panko, return to the buttermilk, then back to the breadcrumbs before frying.
- Cook in Batches: If you’re frying multiple pieces of chicken, do it in batches. Overcrowding the pan can cause the temperature of the oil to drop, leading to soggy chicken.
- Use Fresh Ingredients: Fresh romaine lettuce and high-quality Caesar dressing can make a significant difference in flavor. Choose a dressing you love for the best results.
- Keep it Warm: As you assemble the sandwiches, keep your cooked chicken in a low-temperature oven (around 200°F or 93°C) to ensure it stays warm while you finish toasting the rolls and preparing other ingredients.
How to Store Crispy Chicken Caesar Sandwich
If you find yourself with leftover Crispy Chicken Caesar Sandwich, storing it properly will help maintain its deliciousness. It’s best to store the components separately. Place the chicken in an airtight container and refrigerate it. It should be good for up to 3 days. The lettuce and dressing should also be kept in their own containers to keep them fresh.
When you’re ready to enjoy the leftovers, reheat the chicken in an oven or skillet to crisp it back up again. Avoid microwaving as it can make the bread soggy and chicken less crispy. Once reheated, assemble the sandwich fresh for the best experience.
Variation of Crispy Chicken Caesar Sandwich
There are numerous ways to give your Crispy Chicken Caesar Sandwich a twist! Consider these fun variations to spice things up:
- Spicy Version: Add some heat to your sandwich by incorporating sliced jalapeños or a spicy aioli. You could also use hot sauce in the buttermilk for some extra kick.
- Make it a Wrap: If you prefer not to use bread, turn this sandwich into a wrap by using a large tortilla. Layer the ingredients as you would in the sandwich and roll it up tightly for a portable meal.
- Veggie Alternative: For a vegetarian option, use crispy tofu or a breaded portobello mushroom instead of chicken. Prepare it in the same way for a satisfying bite without the meat.
- Gourmet Addition: Elevate your sandwich with ingredients like avocado, sun-dried tomatoes, or fresh herbs like basil or cilantro for an unexpected twist.
- Different Dressings: Experiment with other dressings if Caesar isn’t your favorite. A tangy ranch or even a honey mustard can create a whole new flavor profile while still keeping that satisfying crunch.
FAQs about Crispy Chicken Caesar Sandwich
What makes the Crispy Chicken Caesar Sandwich so special?
The combination of crispy chicken, fresh lettuce, and creamy Caesar dressing makes this sandwich uniquely delicious. The textures and flavors come together to create a satisfying meal that can be enjoyed any time of day.
Can I prepare the chicken ahead of time?
Yes, you can prepare the breaded chicken ahead of time. Just be sure to store it in the refrigerator. When ready to eat, reheat the chicken in the oven or skillet to maintain its crispiness.
Is there a healthier version of this sandwich?
Absolutely! You can use grilled chicken instead of fried for a lighter option. Swap out regular sandwich rolls for whole-grain options or use lettuce wraps for a low-carb alternative.
How can I make sure my chicken stays crispy?
To achieve a crispy chicken, make sure the oil is hot enough before frying. Additionally, avoid overcrowding the pan and consider baking for a few minutes after frying to ensure it remains crunchy.
What can I serve with my Crispy Chicken Caesar Sandwich?
Pair your sandwich with a light side salad, crispy fries, or even a homemade coleslaw for a complete meal. Enjoying it with good company makes it even better!

Crispy Chicken Caesar Sandwich
Ingredients
For the Chicken
- 4 pieces boneless, skinless chicken breasts
- 1 cup all-purpose flour
- Salt, to taste
- Black pepper, to taste
- 1 teaspoon garlic powder
- 1 teaspoon onion powder
- 1 cup buttermilk
- 2 cups panko breadcrumbs
- 1/2 cup grated Parmesan cheese
- 1/4 cup olive oil for frying
For the Sandwich Assembly
- 4 large sandwich rolls split
- 1 cup Romaine lettuce shredded
- 1/2 cup Caesar dressing
- 1/4 cup shaved Parmesan cheese
- 2 tablespoons melted butter
- 1 clove minced garlic
Instructions
Preparation
- Preheat your oven to 400°F (200°C).
- Pound each chicken breast to ensure even thickness.
Breading Setup
- Set up three shallow dishes: in the first, combine flour with salt, black pepper, garlic powder, and onion powder.
- Pour buttermilk into the second dish.
- Mix panko breadcrumbs with grated Parmesan cheese in the third dish.
Coating the Chicken
- Dredge each chicken breast in the seasoned flour, shake off excess, dip into buttermilk, and press into the breadcrumb mixture.
Frying
- Heat olive oil in a skillet over medium heat.
- Fry breaded chicken for about 4 minutes on each side until golden brown.
- Transfer the chicken to a baking sheet and bake for approximately 15 minutes.
Preparing the Rolls
- Combine melted butter with minced garlic in a small bowl.
- Brush this mixture onto the split sides of the sandwich rolls and toast in the oven for about 5 minutes.
Assembling the Sandwich
- On the bottom half of each roll, place a crispy chicken breast.
- Layer on shredded Romaine lettuce, drizzle with Caesar dressing, and top with shaved Parmesan cheese before adding the other half of the roll.