Looking for a fun and whimsical dessert that will undoubtedly bring smiles to both kids and adults? The Cookie Monster Cake is exactly what you need. This delightful cake, inspired by the beloved character from “Sesame Street,” is not only a feast for the eyes but also a delicious treat filled with chocolate goodness and topped with creative decorations. Whether it’s a birthday celebration, a themed party, or simply a day to indulge your sweet tooth, this Cake is the perfect centerpiece.
Why We Love This Cookie Monster Cake Recipe
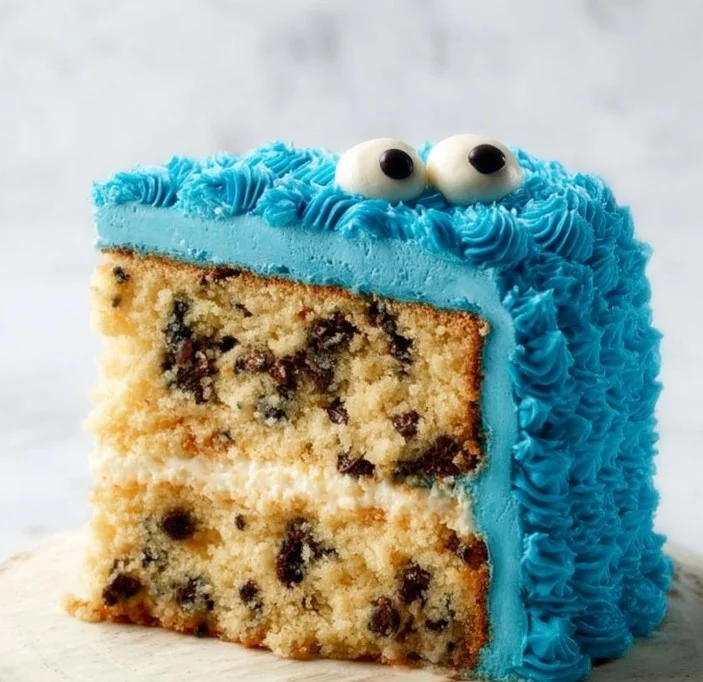
This creation captivates us for so many reasons. The combination of a rich, chocolate cake with gooey chocolate chips ensures a moist and flavorful base. The vibrant blue frosting is irresistibly inviting, transforming a simple dessert into a playful and engaging experience. Who could resist that adorable Cookie Monster face, complete with Oreo eyes and gummy candy pupils? Plus, it’s a cake that encourages creativity in decorating, allowing you to add your unique twist. The Cookie Monster Cake isn’t just a dessert; it’s a delightful celebration that invites everyone to dig in and enjoy!
Ingredients about Cookie Monster Cake
To whip up this delightful Cookie Monster Cake, you’ll need the following ingredients:
- 1 box chocolate cake mix
- Ingredients needed for the cake mix (e.g., 3 eggs, 1/2 cup oil, 1 cup water)
- 1 cup chocolate chips
- Blue frosting (enough to cover the entire cake)
- Brown frosting (for decorating the mouth)
- Oreo cookies (for the eyes)
- Gummy candies (for the pupils)
How to Make Cookie Monster Cake Directions
Creating the Cookie Monster Cake is a fun and straightforward process that yields impressive results. To start, preheat your oven to the temperature displayed on the cake mix box—usually around 350°F (175°C). While the oven is warming up, prepare the cake mix as instructed on the package. Generally, you’ll combine the mix with eggs, oil, and water in a large mixing bowl until it is smooth and well-combined.
Next, fold in one cup of chocolate chips. This extra bit of chocolate will delight any chocolate lover and add gooeyness to every bite. Once everything is blended, divide the batter between two round cake pans and place them in the preheated oven.
Pamper your cake by baking it until a toothpick inserted into the center comes out clean—typically about 25 to 30 minutes. Keep an eye on your cakes to avoid over-baking. When they are done, carefully remove them from the oven and allow them to cool in their pans for about 10 minutes. After that, turn them out onto wire racks to cool completely.
Once your cakes are fully cooled, it’s time to unleash your creativity! Begin by placing one layer of the cake on your serving platter or cake stand. Generously spread blue frosting over the top of this layer, ensuring a thick and even coat that mimics Cookie Monster’s fun, fuzzy appearance. Next, place the second layer on top and cover the entire cake with blue frosting.
Now for the fun part! Use the brown frosting to create a mouth shape at the front of the cake. You can be as creative as you like here, giving Cookie Monster a big, happy grin or a silly expression.
For the eyes, gently twist apart the Oreo cookies, placing one half on top of the cake as the inner eye. Each cookie half will create a cute, playful look for your Cookie Monster. To add a final touch, use the gummy candies to create pupils for the eyes. You now have an adorable, edible Cookie Monster ready to be enjoyed!
How to Serve Cookie Monster Cake
Serving the Cookie Monster Cake is just as fun as making it! Once you’ve decorated your cake, gather your friends and family around. Slice the cake into generous servings, making sure each piece has a bit of that vibrant blue frosting and a tasty Oreo cookie on top. Pair each slice with a glass of cold milk for the perfect combination that mimics the classic cookie-and-milk experience.
If you’re hosting a party, don’t hesitate to incorporate playful elements like cookie-themed plates and cups, adding to the whimsical atmosphere. This cake easily becomes the star of the show, sparking joy and excitement amongst guests of all ages.
For a fun twist, you could even set up a DIY decoration station where guests can add their own gummy candy creations or additional toppings to their slices, fostering a creative spirit that everyone can enjoy.
Expert Tips: Cookie Monster Cake
To ensure your Cookie Monster Cake turns out perfectly, here are some invaluable tips from the pros:
- Use Fresh Ingredients: Ensure your eggs, oil, and any other ingredients are fresh. This helps improve the overall flavor of your cake.
- Avoid Overmixing: While it’s important to mix your batter well, overmixing can lead to a dense cake. Mix just until combined to keep it light and fluffy.
- Cool Completely: Make sure your cakes are fully cooled before frosting. If they’re warm, the frosting can melt and slide off, ruining the cute appearance.
- Frosting Technique: For a smoother frosting finish, use a spatula warmed in hot water to smooth out the blue frosting. Wipe it clean between sweeps for the best results.
- Storing Leftovers: Cover any remaining cake tightly using plastic wrap or an airtight container to keep it fresh and moist for the next day.
How to Store Cookie Monster Cake
If you have any leftover Cookie Monster Cake (though it might be hard to resist), you’ll want to ensure it stays fresh for as long as possible. Simply wrap it tightly in plastic wrap or use an airtight container to keep moisture in and protect it from drying out. If you’ve only cut a couple of slices, placing the remaining cake on a cake stand with a dome lid works perfectly.
You can store the cake at room temperature for up to two days. If you need to store it longer, consider refrigerating it. Just be prepared: the cold might slightly alter the texture of the frosting, but it will still be delicious. Before serving again, allow it to come back to room temperature for the best flavor and texture.
Variation of Cookie Monster Cake
While the traditional Cookie Monster Cake is a joy on its own, you can also put your spin on this delightful dessert! Here are a few fun variations to consider:
- Different Cake Flavors: Instead of chocolate cake, why not experiment with a vanilla or red velvet cake? Each variation provides a unique taste twist while still maintaining that fun Cookie Monster vibe.
- Color Variations: For an equally vibrant option, use different colors for the frosting—like bright green or purple—to create a different character, perhaps inspired by other beloved childhood icons.
- Filling Options: Consider adding a layer of filling between the cake layers, such as whipped cream, frosting, or even cookie dough for a surprise center that will wow your guests.
- Alternative Toppings: Instead of Oreos, try using chocolate-covered cookies or even mini chocolate donuts for the eyes. Different gummy candies can also jazz up your cake’s appearance.
- Cupcake Version: You can create individual Cookie Monster cupcakes, allowing guests to have their adorable serving. Simply bake cupcakes using the same chocolate cake mix and decorate them similarly.
FAQ about Cookie Monster Cake
What is the best way to frost the Cookie Monster Cake?
A great technique is to start with a crumb coat—a thin layer of frosting to seal in crumbs. Chill it briefly before adding the final layer of blue frosting for a smooth finish.
Can I make the Cookie Monster Cake in advance?
Yes! You can bake the cake a day ahead, allow it to cool completely, and store it tightly wrapped. Frost on the day of the event for the best presentation and freshness.
What if I can’t find blue frosting?
You can easily make your own blue frosting by using white frosting and adding blue food coloring. Adjust the amount until you reach your desired shade.
How can I make this cake gluten-free?
Use gluten-free chocolate cake mix and ensure all other ingredients are also gluten-free. Follow the same instructions for preparation and baking.
Can I freeze the Cookie Monster Cake?
Absolutely! You can freeze the cake either whole or in slices. Wrap it well in plastic wrap, and it will stay fresh for up to three months. Thaw in the refrigerator before serving.
With these tips, your Cookie Monster Cake is bound to steal the show at any gathering! So gather your ingredients, get creative, and enjoy the laughter and joy this cake brings. Happy baking!
Cookie Monster Cake
Ingredients
For the Cake
- 1 box chocolate cake mix Plus ingredients specified on cake mix box
- 3 pieces eggs As per cake mix instructions
- 1/2 cup oil As per cake mix instructions
- 1 cup water As per cake mix instructions
- 1 cup chocolate chips To fold into the batter
For the Decoration
- 1 container blue frosting Enough to cover the entire cake
- 1 container brown frosting For decorating the mouth
- 6 pieces Oreo cookies For the eyes
- 4 pieces gummy candies For the pupils
Instructions
Preparation
- Preheat your oven to the temperature displayed on the cake mix box, usually around 350°F (175°C).
- In a large mixing bowl, combine the chocolate cake mix, eggs, oil, and water until smooth.
- Fold in the chocolate chips into the batter.
- Divide the batter between two round cake pans.
Baking
- Bake in the preheated oven for 25 to 30 minutes, or until a toothpick inserted in the center comes out clean.
- Remove from the oven and let the cakes cool in their pans for about 10 minutes, then turn them out onto wire racks to cool completely.
Decorating
- Once the cakes are cooled, place one layer on a serving platter and spread blue frosting over the top.
- Top with the second layer and cover the entire cake with blue frosting.
- Use the brown frosting to create a mouth on the front of the cake.
- Place Oreo cookie halves on top as eyes and use gummy candies for pupils.